Zero Waste Pantry Organization for Small Apartments (Before & After)
Learn a simple step-by-step system to turn a cluttered small pantry into a zero waste, easy-to-use food hub.
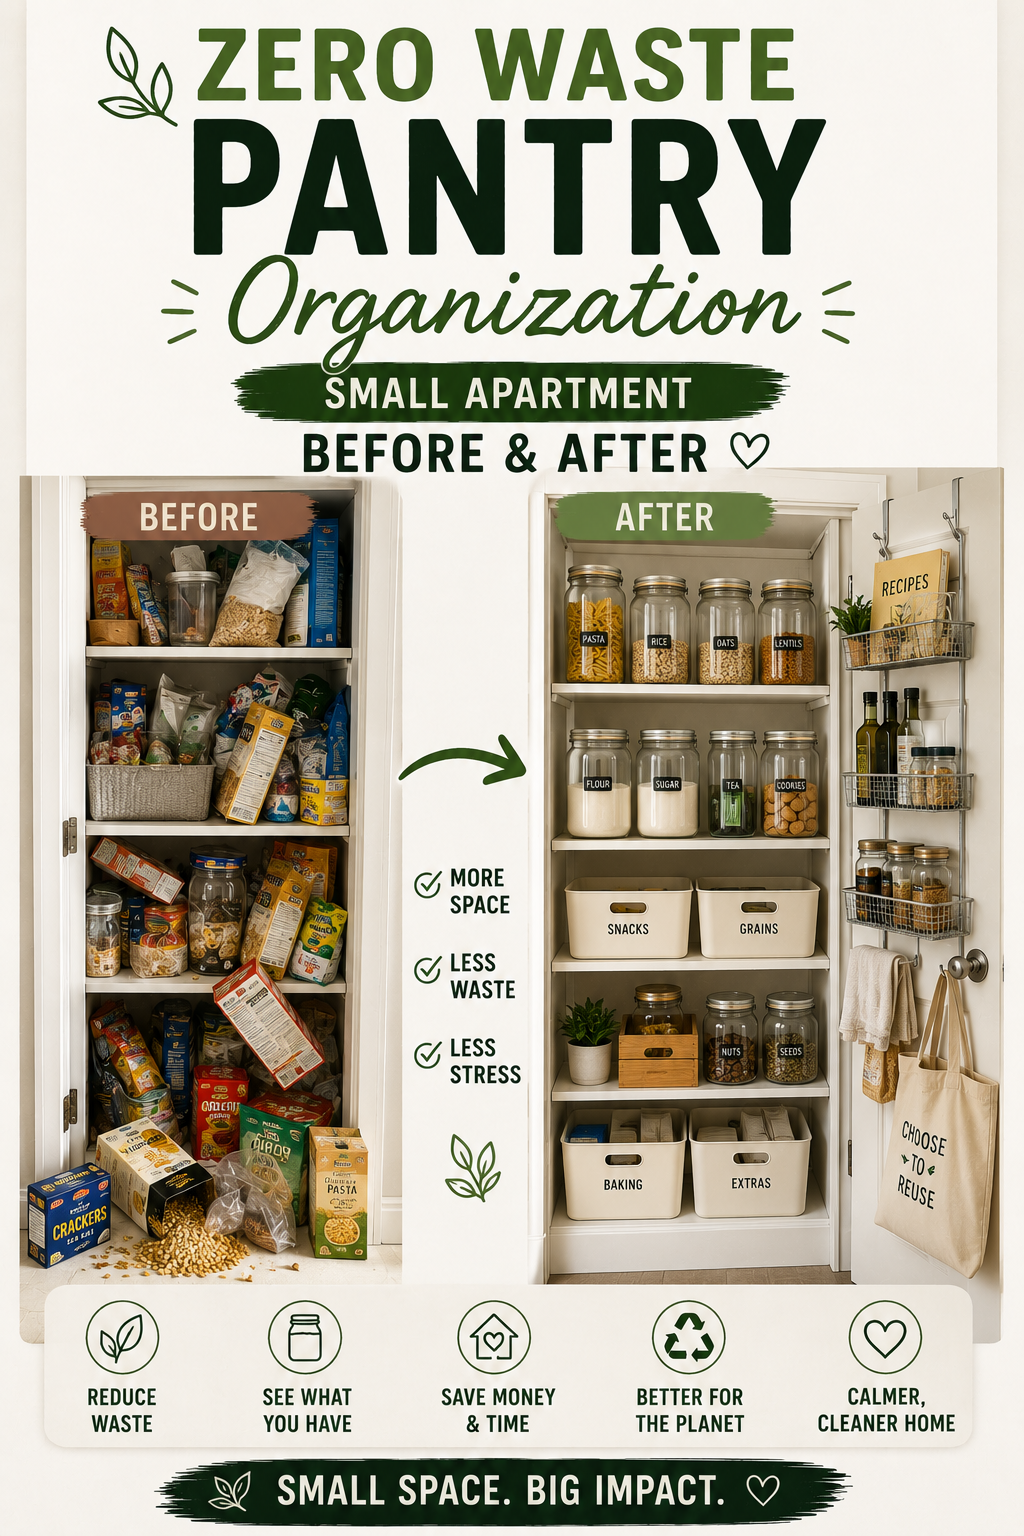
If your small pantry explodes every time you open the door, you’re not alone. Tiny cabinets and deep shelves make it easy to lose bags, buy duplicates, and toss food you forgot you had.
A zero waste pantry isn’t about aesthetic perfection—it’s about seeing what you own, using it up on time, and cutting plastic packaging wherever you reasonably can. This guide walks you through a simple before-and-after process designed specifically for small apartments and narrow pantries.
Why a Zero Waste Pantry Matters
Most pantry waste comes from three things: food hidden behind other items, packaging that doesn’t reseal well, and overbuying because you can’t see what you already have. In a small space, every inch needs to do real work.
By organizing your pantry around visibility and access—clear containers, simple zones, and good rotation—you reduce food waste, save money on groceries, and make cooking feel easier instead of overwhelming.
Step 1: Declutter and Audit Your Pantry
Before any organizing happens, you need a clean slate. This is the true “before” moment of your zero waste pantry makeover.
- Empty everything out. Pull all food, bins, and random items out of the cabinet or closet and place them on a table or counter.
- Sort and check dates. Toss expired items, compost what you can, and set aside unopened non-perishables you know you won’t use to donate.
- Combine duplicates. If you have three half-used bags of rice or pasta, combine them into one container so you can see your real inventory.
- Wipe down shelves. Clean surfaces with a simple, low-tox cleaner so your “after” feels fresh and inviting.
Step 2: Create Simple Pantry Zones
You don’t need 20 micro-categories. A handful of clear zones is enough to keep a small pantry organized and easy to navigate.
- Define 5–7 zones, such as: breakfast, grains and pasta, baking, snacks, cans and jars, spices and oils, and “backstock” or bulk.
- Assign each shelf or section to one or two zones based on how often you reach for those items.
- Keep everyday items like breakfast and snacks between shoulder and eye height, and backstock higher or lower where you don’t grab it as often.
Zones make it obvious where things belong, which means less decision fatigue and less chance of food disappearing behind something else.
Step 3: Build a Clear Jar Storage System
Packaging is the enemy of a zero waste pantry: it hides what you have, goes stale faster, and adds visual clutter. The fix is to decant your most-used staples into clear, airtight containers.
- Shop your home first. Gather clean glass jars and sturdy containers from pasta sauce, nut butters, pickles, and other foods.
- Choose your priority items. Start with what you use weekly: rice, oats, pasta, lentils, beans, flour, sugar, nuts, and common snacks.
- Decant dry goods into jars. Remove as many cardboard boxes and flimsy plastic bags as you can. Clear containers make it easy to see when you’re running low.
- Group containers by height and type. Put taller jars in the back, shorter ones in front, or use risers so you can see every label at a glance.
You don’t need a Pinterest-perfect matchy set on day one. Start with what you have, then slowly upgrade to a consistent set of square or stackable containers as your budget allows.
Step 4: Use Vertical Space and Door Storage
Small pantries usually have more height than depth. The key is to turn that height into usable storage so nothing gets buried.
- Add shelf risers. Tiered risers are perfect for cans and jars; they turn one deep shelf into two visible levels instead of a dark tunnel.
- Use bins as drawers. Place loose items in bins or baskets that you can pull out like drawers to reach the back without digging.
- Hang an over-the-door organizer. If you have a door, use it for spices, packets, snacks, or baking supplies—this is prime real estate in a tiny pantry.
- Reserve floor space for bulk items. If your pantry has a floor area, keep heavier backstock there in lidded bins or buckets.
Step 5: Label, Rotate, and Prevent Waste
A zero waste pantry is as much about how you use food as how you store it. Labels and rotation keep everything moving before it expires.
- Label every container. Even if contents are obvious to you, labels help everyone else put things back correctly and prevent duplicate purchases.
- Add dates where it matters. For homemade mixes or bulk items you rarely buy, add a small date on the bottom or back of the jar.
- Use a simple rotation rule: oldest in front, newest in back. When you restock, slide older jars or boxes forward and put new items behind.
- Create an “almost expired” spot. Keep a small bin for foods that need to be used soon and check it when planning meals or snacks.
Step 6: Maintenance Ritual for Tiny Pantries
Once your zero waste pantry is set up, you only need a few minutes each week to keep it that way. A tiny, consistent ritual beats a massive reorganization every few months.
- Weekly: spend 5 minutes pushing newer items to the back, moving older items forward, and returning stray products to their zones.
- Monthly: do a quick mini-audit of one shelf, tossing anything expired and noting what you’re repeatedly not using.
- Seasonally: wipe down shelves, rinse sticky jars, and reconsider zones if your cooking style or household needs have changed.
Over time, your pantry will stop being a chaotic black hole and start working like a tiny, efficient store: you can see what you have, you use it before it goes bad, and you buy less packaging because reusable containers do most of the work.